Create
Add a RecipeType of food (country)
🇱🇦 Laos 🇻🇳 Vietnam 🇫🇷 FranceType of food
🔥 Grilled 🐟 Fish 🥣 Soup 🥗 Cold Salad 🧁 CakeHome › Recipes › Taiwan › Baked


Taiwanese Moon Cakes - Ludoupong
(0 vote) • by A table c´est Chiou
4 people · Medium · 1520 min · ₭ Cheap
It's almost the the moon festival! In 2020, it will take place on October 1st according to the lunar calendar. It is a celebration that brings together family and friends to enjoy the Moon which is rounder than the other days of the year.
The moon cake was created in China in the ninth century. At first, it was only for nobles and people who passed the national exam. It was since the fourteenth century that Moon Cake began to be popularized and truly consumed by the people. Its shape is often round, which represents the gathering of family and friends. Today I would like to share with you one of Taiwan's moon cakes, the Ludopong. Ludopong was created in Taiwan in the 1980s.
In Taiwan there is also the salty version, but I chose the sweet version which is my grandmother's favorite for you. She validated my recipe herself !!!
Credit FB A table c'est Chiou, YT A table c'est Chiou
Video
Ingredients
Filling
- 200 g of split mung bean
- 80 g of sugar
- 80 mL of water
- 25 g of coconut oil
Dough 'A'
Dough 'B'
Decoration
Preparation
1. Soak the beans in water overnight. The next day drain the water and put the softened beans in a saucepan, add clean water and steam them for 20 minutes.
2. After cooking, add the sugar and oil, and crush the grains with a spatula. The goal is to create a smooth dough. Once the dough is ready, pour it in a hot pan and flatten it to get all the water out. When the dough has just started to crumble, remove it from the pan and set aside. It will be the filling of our moon cakes.
4. Let's move on to puff pastry. Prepare the dough ‘A’: in a salad bowl pour the flour, sugar mixed with water and oil. Mix everything and form a ball. Reserve under cling film to preserve humidity.
5. Do the same with the dough ‘B’.
6. Keep the 2 balls of dough under their cling film for 20 minutes.
7. Meanwhile, cut the filling ball into 12 pieces, form into 12 balls and set aside again under cling film. After the 20 minutes of rest, do the same with the 2 puff pastries ‘A’ and ‘B’ (that is to say, cut them into 12 pieces and then roll them into 12 balls).
8. Let's go to assembly phase: take a ball of dough ‘A’ and flatten it, then top with a ball of dough ‘B’ and reform into a ball and set aside. Do this 12 times with all the dough balls ‘A’ and ‘B’.
9. Now you have the filling and the puff pastry, but the latter is not yet ready because you have to flip it: take a ball and place the top of it on the worktop. Flatten it then roll it into a cigar shape. Repeat this step at least 2 times. The more you do this, the flakier the dough will be, but be careful, it will also be more fragile. For our recipe do not do it more than 3 times. Repeat with the 12 balls of dough.
10. Finally step: flatten your cigar-shaped pasta and garnish with the balls of bean paste filling. Repeat 12 times.
11. Put the cakes on a baking sheet, flatten them a little so that they puff up well when baking. Last step before baking, tradition dictates that each cake is marked with red dots, to differentiate them according to their filling. For my part, I chose to make 3 red dots with a stick.
12. Bake for 12 minutes at 170°C then 25 minutes at 150°C. Enjoy!
 Like
Like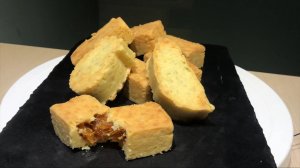


;)
;)
;)
;)
;)
;)
;)